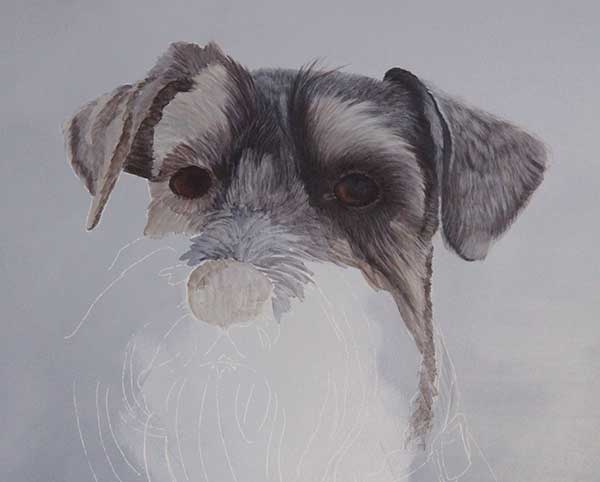
Spent most of my time working on the area around the right eye as well as building up the darker layers inside the eyes themselves. Notice that you can still see some of the “lighter” foundation layer that was applied to the eye last time. I’m almost ready to begin laying the foundation for the “glint” or reflection of light dancing off the wet surface of the eye. The reflection will be put a top the darker values. It is a process of slowly building up the lighter layers….it is not just a big blob of white. Many times that refection is made up of more then one color and different values. Remember it is all about “seeing” the shapes…the values….the color. Not what you “imagine” it to be, but what it really is! One thing I do want to mention….I do use a glazing medium to seal the layers as I go. I don’t seal every single application of paint…..usually after 3 or 4 layers I’ll put on a coat of glazing medium. It serves two purposes. First it protects what I have already done and second it allows me to see the true colors and depth that the painting will have when the varnish coat is applied once finished.
I approach the “reflection” of the eye differently then the “light” in the iris. Why….purely personal. I believe by starting light and retaining that light as I work in the iris, that the light becomes more united or part of the iris rather then just ‘sitting on top’. I want the ‘light’ in the iris to feel as though it comes from within. The opposite is true, for me, when dealing with the reflection….it lies on top….a part of the eye, yet separate. By placing it last…atop the pupil, I still ‘feel’ the depth of the eye….seeing through the reflection into the eye. I know that probably sounds strange to some of you. Understand that when I paint….I’m painting from a place of spirit…of life. I’m not just rendering a two dimensional object….this is a living, breathing, spirit that I am capturing… if only for but a moment! It is always my hope that you will see a glimpse of that animal’s spirit when you look at my paintings. That you will be drawn in for a closer look….reach out and run your fingers across the painting to ‘feel’ the fur.
I know I promised a video and I will get to that….but, in the mean time, here is a closer look at one of my methods for rendering those furry hairs. The first thing I do is thin my paint with water to a ‘wash’ consistency. Next….using an old worn round brush that I adore….I load the brush with the wash of color then flatten and splay out the hairs…..as seen here in this photo…
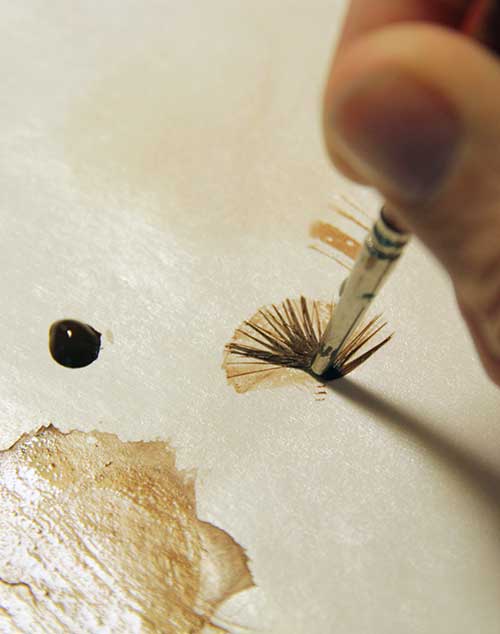
Remember….once you do this to the brush it will never be the same again. You are actually damaging and forcing the hairs to do your bidding….so use an old brush!
Now that you have the brush hairs spread apart….lightly stroke them through the wash puddle once again. Keeping a light touch…drag the brush across your surface and you should see something similar to the photo below…
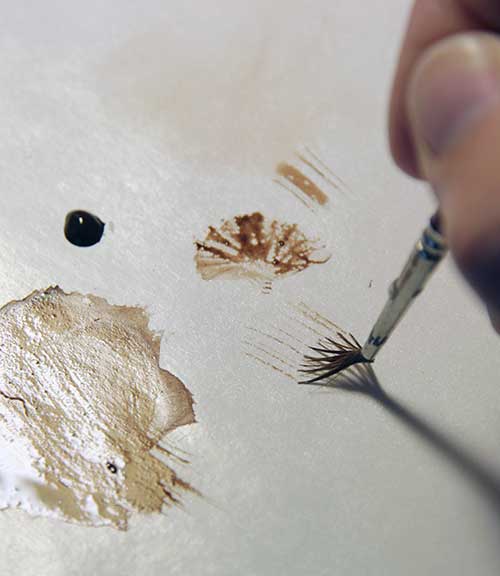
If you don’t get any paint to move from the brush, then you probably need to add more water to your wash. You can and should turn your brush on its side from time to time to vary the stroke and the look of the fur as seen here…..
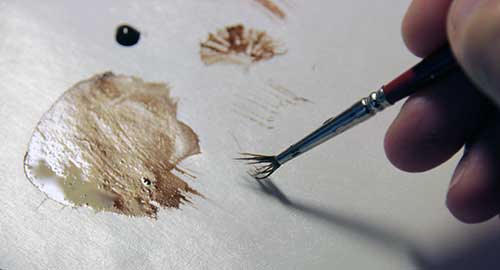
That is just one of my techniques for painting fur…..I have others up my sleeve that I will share with you soon!

Eye (I) can’t wait to try your technique to make the eyes dance. Just adorable… I can feel his fur and see that glint of love in his eyes.
Oh how I wish I had your gift. My sister, brother and mother do! I got my dad’s genes in the artistic department. Round head, stick body. Thank you for sharing this process and explaining your passion about bringing the spirit to life. That makes so much sense. Paintings that don’t have that spirit certainly tend to not sing to me! Buster is singing more and more.
Kelly….nothing wrong with ‘stick figures’ I’ve seen some excellent and fun art using just those little guys and a little bit of color! Thank you for stopping by and so glad that Buster is ‘coming to life’ for you!
I’m totally fascinated by your process Debbie, and so glad you’re giving us a tour.
Glad you stopped by Deborah! I love to share my process and always hope it helps other artist along their creative path!
I love how you describe your process and I can’t wait to see a video! I have quite a few brushes like this….not on purpose but I have them! 🙂
Thanks Michelle….I have soooo many brushes that I have abused one way or another, but I can never seem to throw them away! Just never know when that one wild hair might be just the one I need….LOL!
Love how you explained building up the colors. I do that when I dye yarns. Gives a much richer surface
Thanks Linda….it is a process isn’t it….but so worth it!
Okay, you totally have me with this splayed brush technique. Here I was thinking that you were painting each bit of fur individually with a single-haired brush. But no! The brush splaying technique is brilliant. Now that I know you do that, I’ll be watching the progress of this painting with even more interest, and perhaps a more educated eye. Your comments on the light and reflection in Buster’s eyes are really intriguing. I hear you when you say you paint from the spirit of the animal, but it’s going to take me some time to develop as an artist before I really get what you mean about light and reflection. Thank you — again — for sharing your process and your beautiful art!
Thanks Harmony….glad you are picking up some new techniques. The ideas I expressed about light and reflection are totally a me thing! Everyone finds their own artistic path and you are on a wondrous, joyful journey of your own! Keep the paint a flying girl!
Very nice painting. It’s going to be fabulous when you’re done with it. I can’t wait to see.
I would love to have your ability. Mines a bit ruff around the edges, and I guess has it’s place too.
All Art no matter if its rough around the edges, smooth and polished, or full of fur has value and worth! It is all about expressing what is inside your beautiful self!
Debbie, What a labor of love! Thank you for sharing your process.
You are most welcome, Janet!